
The open source version control system git makes it easier for multiple developers to work on a central repository independently of each other. This article assumes that you already have a working understanding of git, and hosted git platforms such as github. If not, there are lots of tutorials to help you get started. This article is not going to show you some secret git voodoo; rather show you a few different tools that will (hopefully) give you a better understanding of what you are doing inside of your repository. With a more well-rounded idea of your repository, you can exert more precise control over your commits; which is what we should work towards.
With git’s ability to create multiple branches and merge multiple developer's code into one repository, it is easy to get things mixed up. Git's messages like “Detached Head” don’t exactly make things easier, but don’t panic there are tools out there to help. Here is a list of just a few of them.
1. Put your git branch in your terminal prompt
Want to know what branch you are in you are all the time? The bash script git-prompt adds your current branch to your terminal prompt. If knowing is half the battle this script is a great start.
Steps to install
- You can download it here or you can curl it.
curl https://raw.githubusercontent.com/git/git/master/contrib/completion/git-prompt.sh -o ~/.git-prompt.sh
- Next you will need to add a reference to the prompt in your ~/.bash-profile or ~/.bashrc file.
source ~./git.prompt.sh
-
You will also need to add \$(__git_ps1) to your prompt declaration. My prompt declaration is
export PS1='\u$ \w $(__git_ps1 "(%s)")\$'
To better explain what the above means\u$ user \w$ working directory $(__git_ps1 "(%s)") the git branch in parentheses "(%s)" replace/format the output as a string
Final Result Example:

2. Git Flow
Git flow is a beautiful thing. Git flow is not a software, rather a model of standards based on Vincent Driessens branching model. It aids multiple users to work on a central repository independently of each other. Understanding git flow can be extensive, and worth an article of its own. There are lots of other tutorials out there to help you. In brief, git flow is about creating one central hub while using the branching method to work in parallel. It essentially isolates new development from finished work, making it scalable and suited for collaboration.
Since this article is more about tools rather than theory; here is Daniel Kummer’s git flow git extension. This extension provides high-level repository operations. You do not need to install git-flow in order to follow the git flow model, but it does make it nice and easy.
Steps to install
- You need to install git flow on your machine. If you use homebrew.
brew install git-flow
or for debianapt-get install git-flow
-
Cd into the directory that contains your .git file and type the command git flow init. You will have to answer a few questions regarding naming conventions for your branches.

git flow init
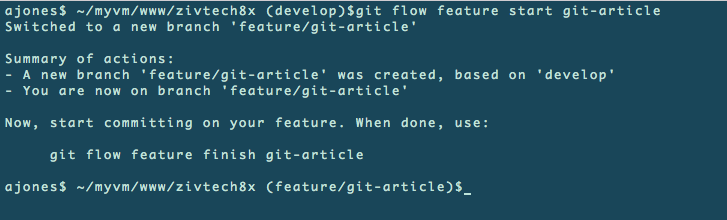
- Now say you want to create a feature branch. Checkout the branch you want to create a feature branch from and you can now type in the terminal:
git flow feature start MYFEATURE
- When you are finished you can just use the command:
git flow feature finish MYFEATURE
Final Result Example:
3. A few git commands to save the day.
So now you are doing great, you have your git branch in your prompt, you are creating feature branches, and you are a git flow ninja. Since this article is about exerting more control over your commits, we can't have tools do everything for us right? Below are just a few git commands that will make your life easier and keep your commit history squeaky clean.
Git Add -p
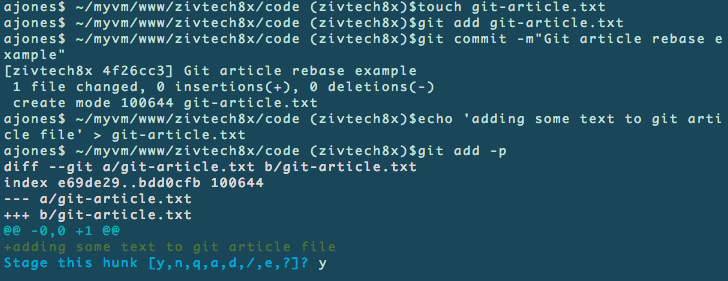
This is a favorite at Zivtech. Git add -p lets you add your commits in small batches. By committing one change at a time, you can exclude changes that do not pertain to your commit message. This is helpful when other developers are reviewing your commit messages. Important to note that git add -p will only add changes to files, not add new files. You will still have to use git add for new files.
git add -p

When you use git add -p you will see the options

Stage this hunk [y,n,q,a,d,/,e,?]?

These options in more detail.
| y - | stage this hunk |
| n - | do not stage this hunk |
| q - | quit; do not stage this hunk or any of the remaining ones |
| a - | stage this hunk and all later hunks in the file |
| d - | do not stage this hunk or any of the later hunks in the file |
| / - | search for a hunk matching the given regex |
| j - | leave this hunk undecided, see next undecided hunk |
| J - | do not stage this hunk or any of the later hunks in the file |
| k - | leave this hunk undecided, see next undecided hunk |
| s - | leave this hunk undecided, see next hunk |
| e - | manually edit the current hunk |
| ? - | print help |
Git Diff
Git-diff will show the changes between your working copy and what has already been indexed. This doesn’t commit anything for you, but it will show you what you have done before you make any commits. It is helpful to see your changes before committing.
git diff
Git Rebase
Commit often & Push less
With git-rebase you can push local commits together into one commit (without force). With rebase, you can commit more often and then merge your commits together before pushing back to the shared repo. For simplicity, we are only going to talk about rebasing locally. This is a little more complicated to explain, so I think it is easier to just show a simple example. For example:
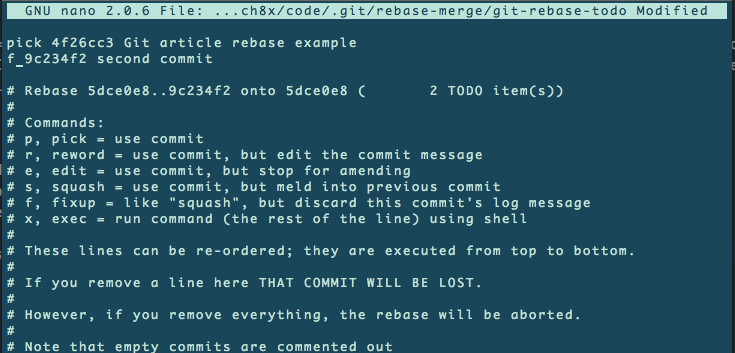
Commands:
| # p | pick = use commit |
| # r | reword = use commit, but edit the commit message |
| # e | edit = use commit, but stop for amending |
| # s | squash = use commit, but meld into previous commit |
| # f | fixup = like "squash", but discard this commit's log message |
| # x | exec = run command (the rest of the line) using shell |
- I created a text file called "git-article.txt" and committed this new file.
- Then I added some new text to this file and made a new commit. I used git add -p, which showed my change. I used the command y to accept this change and committed this change to the git local history. As of right now, both commits touch the same file and really, I only need one commit to represent the changes.
- I can then use
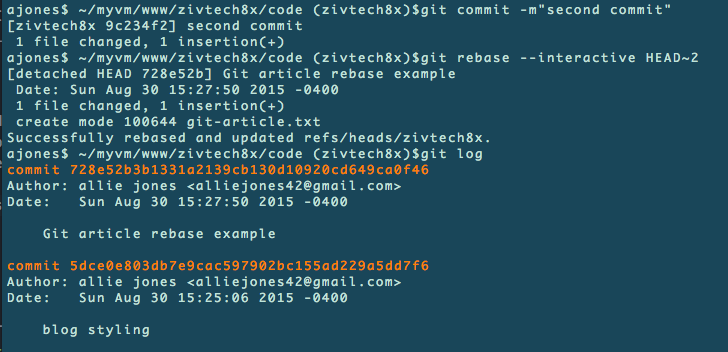
git rebase --interactive HEAD~2to see both commits. I picked one committed and used the command f to amend my changes but discard the commit's log message. I saved these changes.
- Then I used git log to show my recent commits. As you can see from the picture only one commit remains. This leaves a much cleaner history. Rebasing is useful if you forgot to add something to your first commit.
4. SourceTree

Although you can use the terminal for everything you need with git; sometimes it is nice to see a visual of everything that is going on inside your repository. For the developers who love a free gui, there is Sourcetree. SourceTree is nice when you have a stubborn merge conflict because you can get a better visual of what is going wrong. Sourcetree lets you see the difference in committed files, the authors, commit numbers, branches, you name it. SourceTree can help you understand the bigger picture of your repository when lots of developers are all working out of the same project. This tool is really great if you feel a little nervous with the terminal. Another great feature of SourceTree is it has pop notifications when others have committed to your current branch. I will note it is important to not get too dependent on SourceTree, especially if a site will go through multiple environments; for example your production site is located on a different server, it is important to be able to fix and commit by using your terminal.
5. Let’s get Visual: Bonus round with Gource.
Since number 4 was about seeing your git commits visually. I thought it would be nice to take it one step further. Gource is an animated visualization of the git repository. Directories appear as branches with files as leaves. It is notably cool when you have multiple developers working on a project because you can see them working on the tree simultaneously.
Steps to install
- If you use homebrew to install Gource.
brew install gource
-
From your terminal, cd into a project and run the Gource command. Gource also has parameters to control what gource is visualizing.
You can also check out more controls, settings and documentation on gource.
gource
Some examples
Width and height: gource -f 1280x720 Time. Specify the period of the project history to display: gource --start-date'2015-01-01'
Here is the source bloom of zivtech.com in June 2015. As you can see we have recently made some changes to the website.